With proper set-up, Cyan’s Plasma plug-in for 3DSMax will convert your Max models into playable URU files. But Plasma needs a few bits of info from you. Here are the basic set-up steps:
For each Age you create, you should make a folder whe Plasma will store its output files . That folder, in turn, must contain a folder named dat, and in this dat folder you must create a text file named for your Age, with the suffix .age, containing the following information:
Under Max’s Plasma
Export panel, the “Client
Path:” window should
show the path to this same
storage folder. Note that
this folder path is NOT
loaded along with your .max Agefile!
Also note that you
cannot type a path into this slot; the path can
only be set
here by using the “Browse” button .
.
The Plasma plug-in also needs other information about the qualities that can be assigned to items in your Max file that are to be processed into URU Age assets. A huge number of functions can be assigned through the Plasma/
Component Manager
window. The most basic and essential Component takes any object you want processed into your URU Age and assigns it to a Page (your first Ages will probably only need one Page, automatically called “mainroom”). In the Component Manager, click on New/Misc/Page Info and you’ll see
PageInfo01
appear, as above. Now, select any of the items in your 3DSMax project that you want to appear in your URU Age, then click on PageInfo01 in your Component Manager and then the
"Attach to Selected Objects"
button.
The other essential Plasma tool is the Component Utilities panel. The best way to make this panel accessible is through the
Configure Button Sets
panel, seen below. You’ll need to add one to the number of
Total Buttons
, then select Component Util from the list at left and drag it to your
new blank button
. Buttons can also be re-ordered in this panel, for your convenience. Now, with the Component Util button selected in your Utilities panel, you’ll see
all the components
assigned to any object selected in your scene. If you click on PageInfo01 in that list, the particulars for that component will be displayed (you may have to click on the scroll-down arrows to view them). Make sure that the Age displayed
here
matches the one in your specified
dat folder
!
When you have successfully done a Plasma export to the output folder you created, you'll want to see your work in-game. Unfortunately, Plasma's output is not compatible with the single-player offline version of URU. But fortunately a very smart little application named "Drizzle" contains a feature to convert Plasma output data to game-ready files.
The only tabs in Drizzle that you need to work with are the first UAM tab (clear instructions are under the Help tab), and the tab labeled "The Art". Here, you need to select the
same output folder for your current project
named in Plasma Export's Client Path and in your URU installation's PlasmaMax2.ini file. In the
Ages slot
, you'll type the exact Age name as in the .age file you placed in your
dat folder for the above output folder and in Component Manager's Page Info slot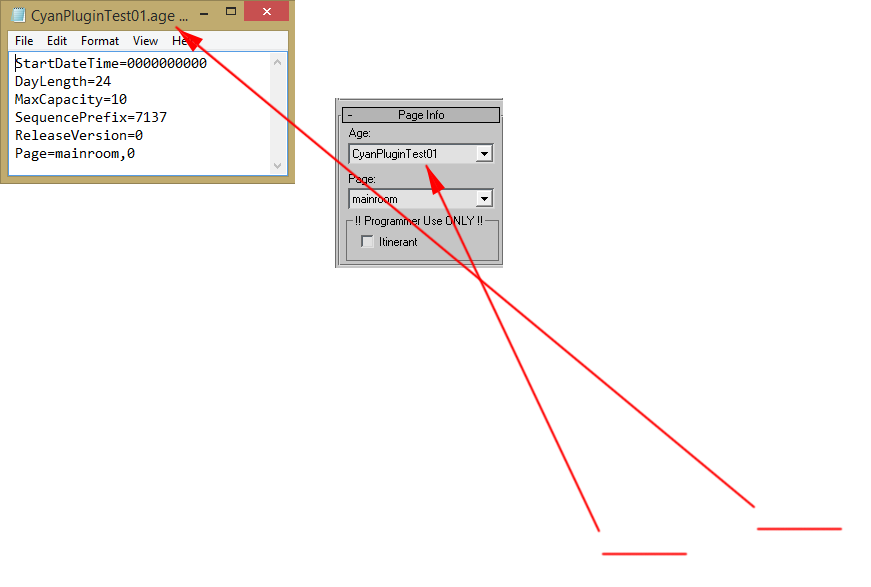
- but with no .age suffix.
If you check the
"Launch URU after converting"
box, Drizzle will convert your Age, then it'll automatically go to the URU folder you specified in its UAM tab and start URU for you.
Once you arrive in-game to your Relto (and you’ve installed your Offline KI - also through the UAM tab in Drizzle), you can simply type
/link YourAgeName to be transported to your newly-converted Age!